Digital Prototyping - The Ultimate Guide

Digital prototypes can be an enormous time saver during the software development process. Digital prototyping offers a rapid approach to collecting feedback. In our case, the "customer" is usually a client that we're building an app for. Instead of spending time on a high-fidelity UI, or coding time-consuming features, we can spin up a prototype in a week and get answers quickly!
Our team have become big fans of digital prototyping over the past few years, and it's saved our butts more than once. Sometimes when we think we understand what our client wants, we're way off the mark.
This article will lay out all the insights we've picked up on the topic of digital prototyping. Please leave a comment at the bottom of the article if you get any value from our guide!
What is digital prototyping?
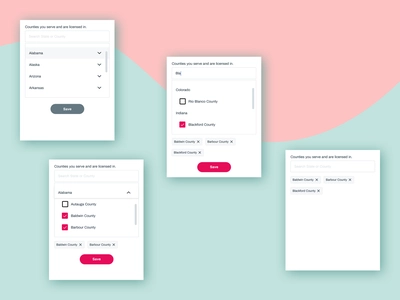
Digital prototyping is the process of using low-fidelity wireframing or rough illustrations to quickly build a representation of a product or idea. The key ingredient to prototyping is interactivity. A digital prototype only becomes useful when it can be used like an actual product.
"Interactivity" in digital prototypes is really just letting users click on links, buttons and features to show them roughly what will happen in a real product.
How to create a digital prototype
When our team creates a digital prototype, we'll start with a Product Roadmapping Session to collect all the details about what needs to be built, the goals of the project, and what will make the project a wild success. I won't go into this in any more detail because I've written an extensive guide to Product Roadmapping that you can check out.
Once we've got the details of what the client is looking to build, we'll map out a handful of super rough user journeys. Users want to achieve particular goals when they use any application, and this usually involves navigating between several pages.

For example, a user journey for Facebook might be changing a profile picture. The steps for this journey would be:
- Log in
- Navigate to profile
- Open media library
- Pick a photo or upload a new image from device storage
- Edit photo
- Confirm
- Navigate back to feed to check implementation
This journey would require the following screens:
- Login screen
- Password reset screen (in case they can't log in)
- User profile
- Media gallery
- Image editing screen
- Confirmation modal
- Feed
Once we've got all the screens laid out with arrows showing how they connect, it's time to move on to the low-fidelity design.
Since we've been doing this for a few years now, we've got a couple of Figma wireframing libraries with all the components we need to quickly build indicative user interfaces. If you're new to digital prototyping, it can be easier to do this part manually by drawing boxes.

The goal of building the low-fidelity design is to show where all the major components will sit in relation to each other. Don't worry about graphic design during this step. The colour, size and styling of your rough components don't matter. But if a component needs a button, dropdown, filter, input or field, it's critical to reflect this in the final product.
Keep in mind that prototyping is supposed to be fast. It's okay if what you produce isn't perfect, as long as it aids the conversation.
The final step of prototyping is animating fields and controls, and linking the screens together. Users should be able to click on anything they normally would on a website and see it respond in a logical way. i.e. Clicking on a dropdown field should show the list within. Similarly, users should be able to jump around from screen to screen to emulate how a user would actually navigate around the product.
What's the benefit of creating digital prototypes?

Prototyping saves time and money, assists hard conversions, and results in better products. There's almost too many benefits of creating digital prototypes, but we've done our best to summarise the things we thought were most important:
Acts as a visual aid for detailed feedback
Have you ever tried to articulate a visual concept? It's difficult, and sometimes you'll just end up grabbing a pen and paper to draw what you're trying to explain. This is how digital prototyping works. It helps by allowing feedback to be represented visually.
Helps support early user testing
Large applications can take months to get to the point where users have a chance to provide feedback. Prototyping short circuits that process and allows users an early opportunity to test the product.
Virtually explore difficult concepts
Some concepts are hard to understand and even harder to design. Since prototyping doesn't focus on the detail, but instead goes for the 10,000 ft view, it allows some of these concepts to be explored without getting stuck on the minute details.
Verify user needs
The biggest risk to any new product is that it's not going to fully serve the user's needs. This usually happens because the app creator thinks they have a great idea that people will want without first checking if users actually want it. Prototyping provides a rudimentary way for product creators to check with their users and verify that their tool is going to make life easier.
Highly collaborative
Collaboration is a key to any successful project. When our team works with clients, we meet once a week and run through everything we've been working on. Introducing prototyping into this situation lets our clients work with us to troubleshoot problems that require their industry knowledge and our technical expertise.
Verify business goals
Sometimes businesses don't understand their own goals, beyond making money and reducing costs. Prototyping forces them to see a solution in action and consider whether it's going to solve their problem.
Speed up the product's development
Building applications can be quite quick if all the details are laid out in full and the amount of re-work is kept to a minimum. Spending time on prototyping helps catch some of the problems that would have otherwise popped up during development, causing much longer delays to the product's release.
Quickly test and validate new ideas
Prototypes are quick to build and quick to change. That means they're a good way to validate new ideas that that product team might have thought of at the 12th hour (or even during a meeting).
Shared understanding
A problem that is difficult to avoid in software development is assuming everyone understands an idea the same way you do. For technicians, we recognise limitations of particular technologies and concepts, but this isn't true for all entrepreneurs. Similarly, developers often misinterpret industry-specific features because they don't have all the information on how things work. Prototyping allows both parties to come to a shared understanding because the details are visually hashed out.
Source of truth for designers and developers
Once a project gets moving, there are often a dozen different places information is gathered from; the Product Roadmap, user stories, acceptance criteria, emails, client meetings, project managers, etc. Consolidating these details into a prototype allows both designers and developers one source of truth to check as they start building the product.
Digital prototyping software & tools
We're going to list a couple of the prototyping tools we've used at Clean Commit. This isn't going to be a comprehensive list of 100 different tools. To be honest, you only need one tool, and it's far and away the best, and it's free.
Figma
Figma is hands down the best digital prototyping tool on the market. While it takes a little while to learn, it's significantly simpler than something like Photoshop, which takes training to use.
Figma is great for prototyping for a few reasons. Firstly, it's a cloud-based app where each user's changes are being reflected in real time. You can see other users' cursors flying around the screen, and as they make changes to the prototype, everyone gets to watch. This makes collaborative sessions super productive.

Secondly, it offers all the tools you need to build prototypes quickly and connect them together. Animating dropdowns, clicking checkboxes and linking between screens is quick and easy.
Thirdly, Figma has a paired prototyping product called Figjam that is kind of like a digital whiteboard. It provides quicker, more block-like tools for building prototypes and simple user interfaces.

Finally, Figma has been so well received by the design and development community that it now boasts a massive library of templates. Want a wireframing template to speed things up? No problem, there are a dozen to choose from.
Adobe XD
Adobe XD is another excellent tool that has many of the traits of Figma. Adobe XD is the choice of professionals who are already deep into the Adobe world. Since Adobe charges a membership fee for access to their tools, it's a premium tool that may already be at your disposal.
To be frank, we've used Adobe XD for a handful of projects and pretty much always convert the project to Figma.
Digital prototyping examples

Rather than share a finished prototype and risk upsetting one of our clients, I've recorded a video showcasing prototyping samples we've recently finished.
Here's an example of one of our prototyping models.
Digital prototyping costs
If you're building your own prototype, then all it will cost is time and effort. However, if you're working with an agency, expect to pay somewhere between $5,000 and $20,000, depending on the project you're building and how many team members need to be involved.
Before you start to panic, companies that charge the high of the estimate often discount the application development project by some portion of that cost. That's how our team operates, however we don't charge nearly that much!
Digital prototyping alternatives
Creating a digital prototype isn't the only way to approach idea validation. For some projects it would be wasted effort, because the parties have a template to follow.
We're working on a project right now that fits this description. It's a custom, lightweight version of an existing tool. Since we can see how that tool looks and how it operates, there's no need to create a prototype.
The alternative in this situation is to build a series of proof of concepts and a high-fidelity design. A proof of concept is a technical experiment to prove that something can be done. Usually with a challenging app, that means building a slimmed down version of the most difficult features.
A high fidelity design is a static version of the finished product. It's detailed and should look exactly like the finished design.
Conclusion
That's it for this article on prototypes (more from our team can be found here). We've covered a few of the questions we get asked frequently by our clients. If you have more questions, want to see more examples, or need clarification on your own project please add a comment below and we'll respond in a day or so!


