Seamless Shopify Remix Deployment: A Guide to Laravel Forge & TursoDB

With Shopify advancing its checkout extensibility features, the need for bespoke apps tailored for Shopify Plus merchants is increasing. To streamline our deployment process and facilitate the development of Remix-based Shopify applications, we've chosen a minimalist set of tools.
Since the Remix starter app relies on SQLite, we opted for TursoDB to manage our SQLite databases in production. For server management, we’ve went with our favourite - Laravel Forge to simplify and automate server setup and maintenance.
Set Up Your Database with TursoDB
Start by logging into your TursoDB account. From the dashboard, create a new database instance. Follow the prompts to set up your database, including selecting the appropriate region.
Once the database is created, you'll need to generate a Read & Write authorisation token that will work with your Shopify application.
Connecting Remix Shopify App with TursoDB
In our case we're using Prisma with Turso. To connect the initial remix template with Shopify App you'll need to adjust the initial setup a bit.
First install libSQL database client and Prisma ORM driver adapter for libSQL packages:
$ npm install @libsql/client @prisma/adapter-libsql
Update db.server.js file to use the new adapter
import { PrismaClient } from "@prisma/client";
import { PrismaLibSQL } from "@prisma/adapter-libsql";
import { createClient } from "@libsql/client";

const prismaClientSingleton = () => {
  const libsql = createClient({
    url: process.env.TURSO_DATABASE_URL,
    authToken: process.env.TURSO_AUTH_TOKEN,
  });

  const adapter = new PrismaLibSQL(libsql);

  return new PrismaClient({ adapter });
};

const prisma = global.prisma || prismaClientSingleton();

if (process.env.NODE_ENV !== "production") {
  if (!global.prisma) {
    global.prisma = prismaClientSingleton();
  }
}

export default prisma;
Update prisma configuration file prisma.schema
generator client {
  provider = "prisma-client-js"
  previewFeatures = ["driverAdapters"]
}

datasource db {
  provider = "sqlite"
  url      = env("DATABASE_URL")
}
Update your .env file by passing Turso Database Url and AUTH token
DATABASE_URL=file:./dev.db
TURSO_DATABASE_URL=libsql://[database].turso.io
TURSO_AUTH_TOKEN=
Migrating database to Turso
It's time to move all off the existing migrations to your Turso DB, in order to do that you'll need to create an .sql script to run the migrations and import it into the database.
$ npx prisma migrate diff --from-empty --to-schema-datamodel prisma/schema.prisma --script > init.sql

$ turso db shell [database] < ./prisma/migrations/
To apply any subsequent migrations you'll have to generate them and apply them manually
$ npm run prisma migrate dev --name migration

$ turso db shell turso-prisma-db < ./prisma/migrations/20240922132717_migration/migration.sql
Preparing a server with Laravel Forge
Laravel Forge is a powerful server management and deployment tool designed primarily for Laravel applications, but its versatility extends to a wide range of applications, including those built with Node.js. Forge simplifies the process of provisioning and managing servers, automating tasks such as server configuration, deployment, and monitoring.
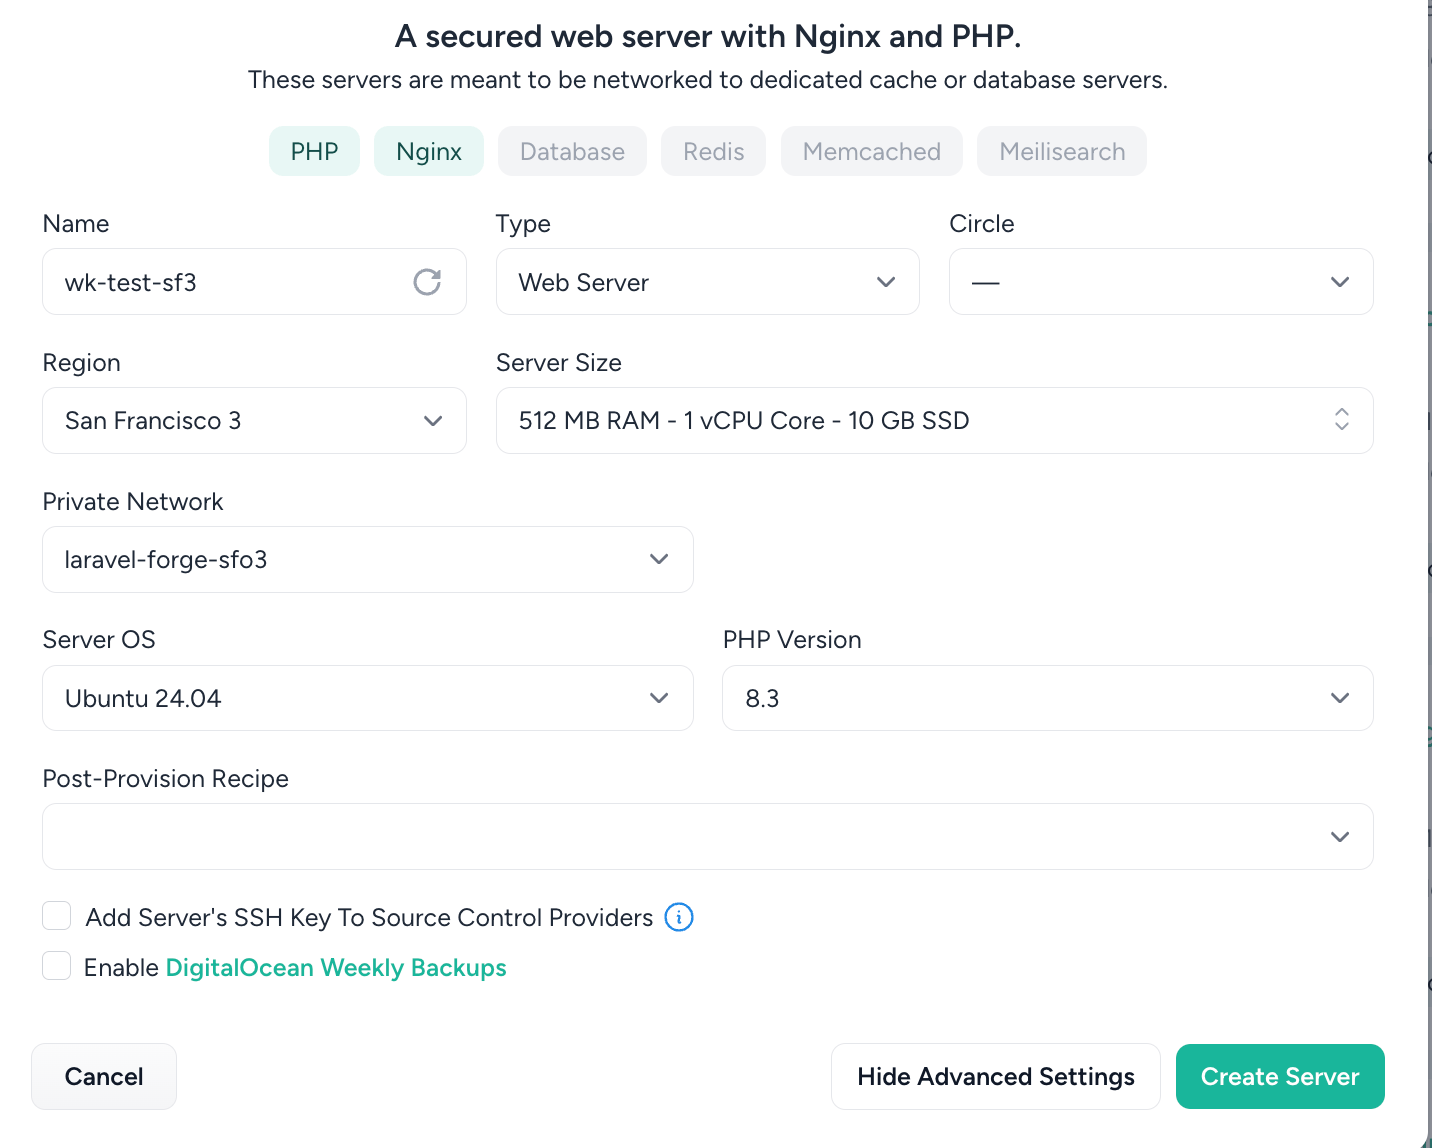
For your Shopify Remix application, which doesn’t need a database, we’ll kick things off with a Web Server preset. Don’t worry about PHP cluttering up your setup; we'll trim it away and fine-tune the server to perfectly match your Remix needs.
Creating a server
To create a server with Laravel Forge, log into your Forge account and hit "Create Server." Choose your provider (we use Digital Ocean) nad preset - in our case Web Server.
After the server provisions, you need to sync the application with your repository by passing the account-name/project-name and selecting a branch. Once the repository is successfully connected and installed there are just a couple steps left.
Update Node version if necessary
Sometimes, Forge might kick off with an older version of Node than you need. No worries—just SSH into your server or run the script below, or create a Forge Recipe, to update to Node v20. If you prefer, you can also install NVM (Node Version Manager) on the server to keep your Node versions in check with your application's needs.
curl -fsSL https://deb.nodesource.com/gpgkey/nodesource-repo.gpg.key | sudo gpg --dearmor -o /etc/apt/keyrings/nodesource.gpg
NODE_MAJOR=20
echo "deb [signed-by=/etc/apt/keyrings/nodesource.gpg] https://deb.nodesource.com/node_$NODE_MAJOR.x nodistro main" | sudo tee /etc/apt/sources.list.d/nodesource.list

sudo apt-get update --allow-releaseinfo-change && sudo apt-get install nodejs -y
Create a daemon to run Shopify App
Time to get your Shopify app running smoothly! First, let’s set up a daemon to keep things chugging along. We’ll use the command npm run start, and it should be run in the folder where your app is living— /home/forge/domain-name.com.
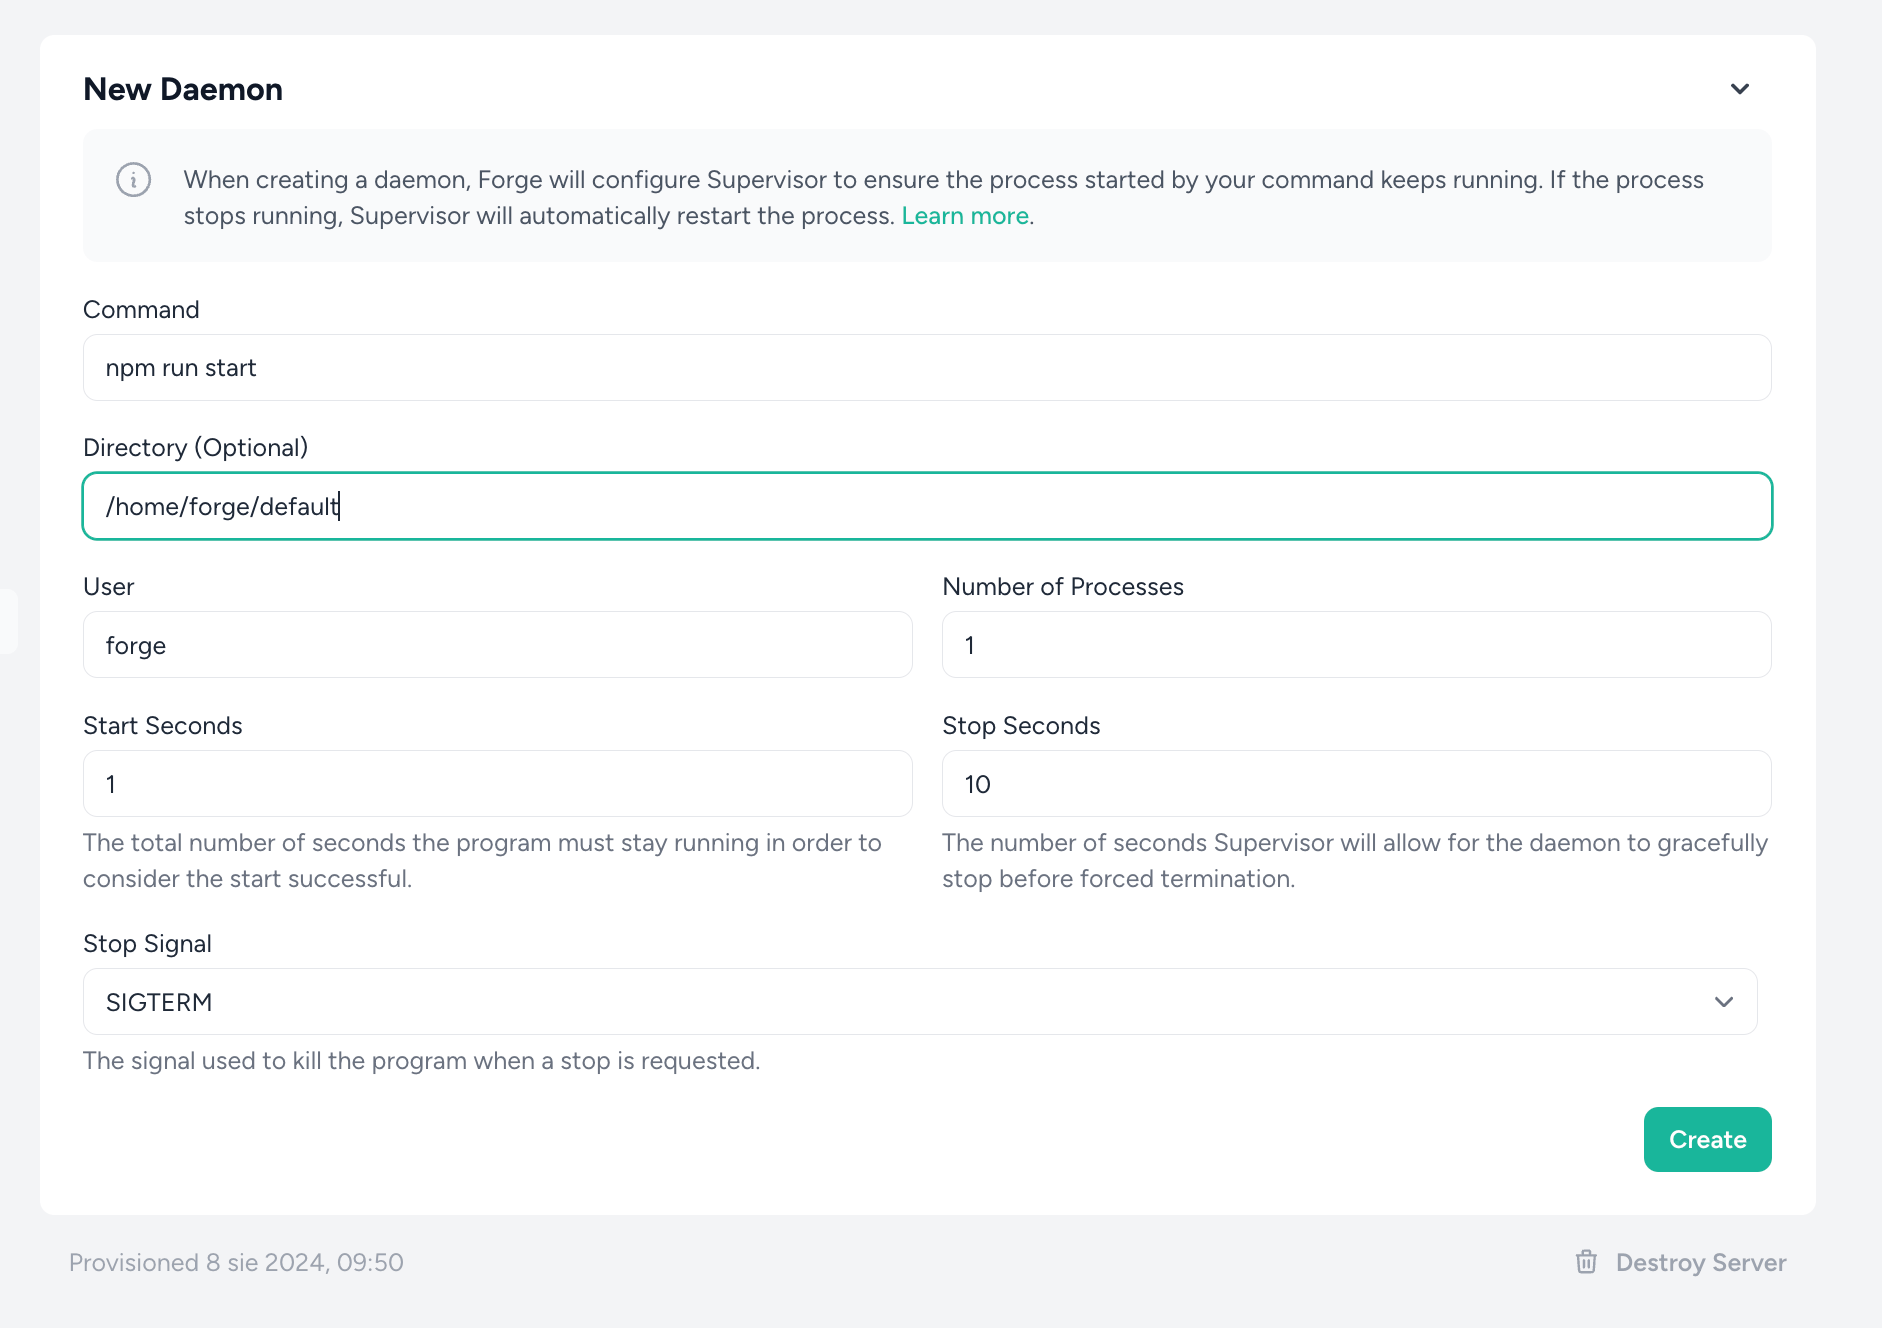
After your daemon is up and running, grab the process ID so you can easily restart it during deployments. Think of it like giving your app a personal assistant that keeps it on its toes!
Configure deployment script
Let’s get your Shopify App deployments running like a well-oiled machine! The key is to configure the deployment script so that your app gets built and the daemon gets a fresh start.
Here’s a basic script for deploying your Shopify app on Laravel Forge:
git pull origin $FORGE_SITE_BRANCH
npm ci
npm run build
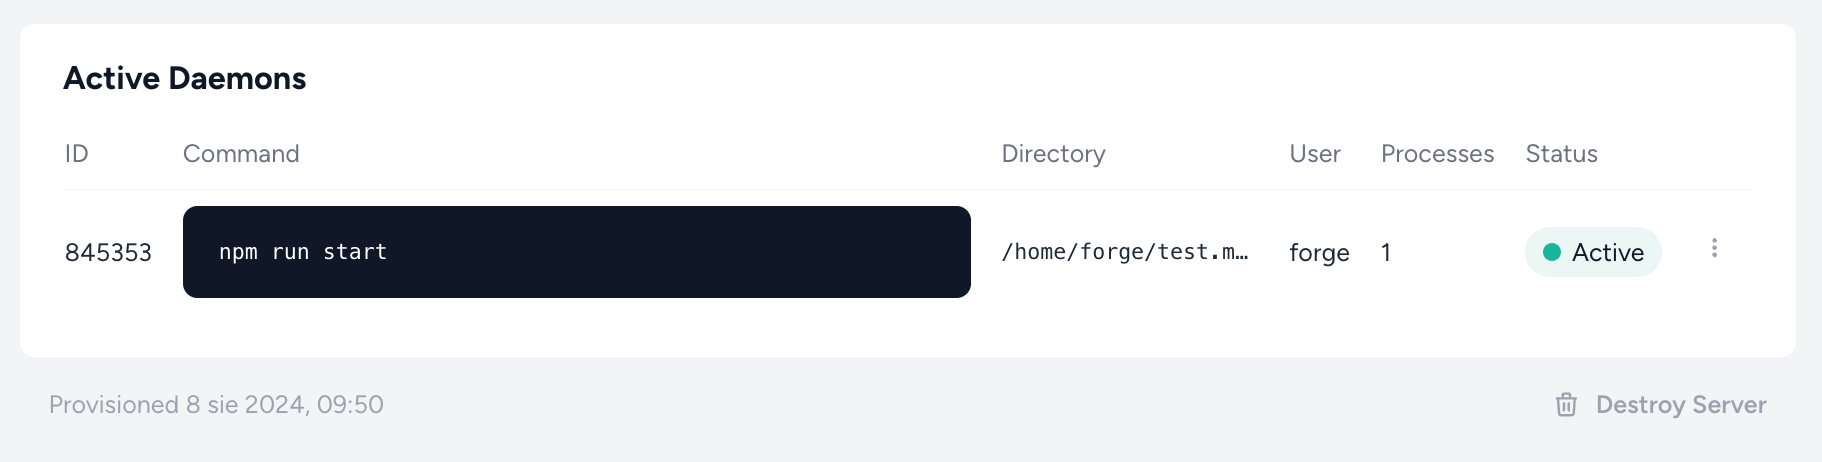
sudo -S supervisorctl restart daemon-946354:*
Just swap 946354 with the ID of your daemon from earlier.
If you’re using NVM, don’t forget to add nvm use right after git pull to make sure you're on the right Node version defined in .nvmrc file.
Give Nginx a Remix for Your Shopify App
Now, for the grand finale—tweaking the Nginx configuration! Laravel Forge sets you up with a basic config that’s all about PHP, but we’re here to remix it for your Shopify app.
## Default configuration
    location ~ \.php$ {
            fastcgi_split_path_info ^(.+\.php)(/.+)$;
            fastcgi_pass unix:/var/run/php/php8.4-fpm.sock;
            fastcgi_index index.php;
            include fastcgi_params;
    }

## Node/Remix configuration
    location / {
        proxy_pass http://127.0.0.1:3000;
        proxy_http_version 1.1;
        proxy_set_header Upgrade $http_upgrade;
        proxy_set_header Connection ‘upgrade’;
        proxy_set_header Host $host;
        proxy_cache_bypass $http_upgrade;
    }
The new configuration is designed to handle requests for a Node.js app, such as a Shopify Remix app. Instead of processing PHP, it proxies all incoming requests to a Node.js server running on http://127.0.0.1:3000.
location /: Matches all incoming requests, regardless of the path, and sends them to the Node.js server.proxy_pass http://127.0.0.1:3000;: Directs all traffic to the Node.js app running locally on port 3000.proxy_http_version 1.1;: Ensures the proxy uses HTTP/1.1, which supports features like keep-alive connections, necessary for modern web applications.proxy_set_header Upgrade $http_upgrade;andproxy_set_header Connection 'upgrade';: These headers are essential for handling WebSocket connections, allowing your Node.js app to manage real-time communications.proxy_set_header Host $host;: Preserves the original Host header in the request, making sure the app knows the correct hostname it’s serving.proxy_cache_bypass $http_upgrade;: Prevents caching for upgraded connections (like WebSockets), ensuring a direct, uninterrupted connection.
In short, this change redirects all incoming traffic from Nginx to your Node.js app, ditching the PHP processing in favor of serving your Remix-based Shopify app directly.
Deploy the App
Now, it’s time for the moment of truth—deploy your Shopify app! With everything set up, just push your code, and if you’ve enabled Quick Deploys, Forge will automatically redeploy your app with every new commit to the branch. Head over to your domain and check that everything is up and running smoothly!
Server Cleanup: Disable PHP-FPM
Since we're not using PHP, we can safely disable php-fpm process to save resources for serving Remix application. I suggest to run this as a Forge Recipe, but you can also do it directly on the server.
sudo systemctl stop php8.4-fpm
sudo systemctl disable php8.4-fpm
Wrapping Up
Congratulations! Your Shopify Remix app is now live, running on a lean, Node-powered server with everything fine-tuned for optimal performance. From setting up your database with TursoDB to deploying via Laravel Forge, you’ve got a streamlined process that makes managing your app a breeze.
Want to dive deeper into Shopify's latest changes? Check out this article on adapting to Shopify's new checkout extensibility for more insights. Plus, explore other guides on server management, database optimization, or reach out to supercharge your Shopify experience with custom apps and seamless integrations. Happy coding! 🚀


