Sending Emails in Laravel: Mailable Classes, Templates & Laravel Versions

For creating apps with PHP, software engineers may choose Laravel, a PHP framework that optimizes emailing processes. Laravel allows you to manage email previews, has various options for localization, and ensures that real users never see test emails in their inboxes.
The available documentation and tutorials cover most of the questions on managing emails in Laravel. Still, new releases and constant updates may cause questions. So let's go through the most frequent ones: how to send emails in Laravel, and manage mailable classes and Blade templates.
Сreating Mailable Class
Each type of email sent in Laravel is presented as a mailable class. It is stored in app/Mail directory that is automatically generated as soon as the class is created using the make:mail Artisan command:
php artisan make:mail OrderShipped
Configuration for mailables is done in several methods — envelope, content, and attachments.
Configuring The Sender
Using The Envelope
In Laravel, we have two ways to configure the sender.
Firstly, it may be specified on the message's envelope:
use Illuminate\Mail\Mailables\Address;
use Illuminate\Mail\Mailables\Envelope;

/**
* Get the message envelope.
*
* @return \\Illuminate\\Mail\\Mailables\\Envelope
*/

public function envelope()
{
    return new Envelope(
        from: new Address('[email protected]', 'Jeffrey Way'),
        subject: 'Order Shipped',
    );

}
Using a Global from Address
When your application has the same sender address for all the emails, you may specify an address in the config/mail.php configuration file. If there is no fixed "from" address within the mailable class, the system will use this one:
'from' => [
  'address' => '[email protected]',
  'name' => 'App Name'
],
Use global "reply_to" address within config/mail.php file:
'reply_to' => [
	'address' => '[email protected]',
	'name' => 'App Name'
],
Configuring The View
You may define the view or the template needed to be used when rendering the email's contents within the content method:
/**
* Get the message content definition.
*
* @return \Illuminate\Mail\Mailables\Content
*/

public function content()
{
    return new Content(
        view: 'emails.orders.shipped',
    );
}Plain Text Emails
Specify the plain-text template when creating the Content definition to define a plain-text version of an email:
/**
* Get the message content definition.
* @return \Illuminate\Mail\Mailables\Content
*/

public function content()
{
    return new Content(
        view: 'emails.orders.shipped',
        text: 'emails.orders.shipped-text'
    );
}
You may use the html parameter as an alias of the view parameter:
return new Content(
    html: 'emails.orders.shipped',
    text: 'emails.orders.shipped-text'
);
View Data
You may use one of two to view data:
Via Public Properties
Any public property defined on the mailable class will be available to view automatically.
For instance, pass data into the constructor and set that data to public properties:
<?php

namespace App\Mail;
use App\Models\Order;
use Illuminate\Bus\Queueable;
use Illuminate\Mail\Mailable;
use Illuminate\Mail\Mailables\Content;
use Illuminate\Queue\SerializesModels;

class OrderShipped extends Mailable
{
    use Queueable, SerializesModels;
    /**
    * The order instance.
    * @var \App\Models\Order
    */

    public $order;

    /**
    * Create a new message instance.
    * @param  \App\Models\Order  $order
    * @return void
    */

    public function _construct(Order $order)
    {
        $this->order = $order;
    }

    /**
    * Get the message content definition.
    *
    * @return \Illuminate\Mail\Mailables\Content
    */

    public function content()
    {
        return new Content(
            view: 'emails.orders.shipped',
        );
    }
}
When the data is set to public property, you may access it:
<div>
    Price: {{ $order->price }}
</div>
Via The with Parameter
When you need to customize the email's data format before it is delivered to the template, pass the data manually to view via the Content definitions with parameter.
Set the data to protected or private properties, and the data will no longer be automatically available to the template:
<?php

namespace App\Mail;
use App\Models\Order;
use Illuminate\Bus\Queueable;
use Illuminate\Mail\Mailable;
use Illuminate\Mail\Mailables\Content;
use Illuminate\Queue\SerializesModels;

class OrderShipped extends Mailable
{
    use Queueable, SerializesModels;

    /**
    * The order instance.
    * @var \App\Models\Order
    */

    protected $order;

    /**
    * Create a new message instance.
    * @param  \App\Models\Order  $order
    * @return void
    */

    public function _construct(Order $order)
    {
        $this->order = $order;
    }

    /**
    * Get the message content definition.
    *
    * @return \Illuminate\Mail\Mailables\Content
    */

    public function content()
    {
        return new Content(
            view: 'emails.orders.shipped',
            with: [
                'orderName' => $this->order->name,
                'orderPrice' => $this->order->price,
            ],
        );
    }
}
You may access it as soon as it is passed to the withmethod:
<div>
    Price: {{ $orderPrice }}
</div>
Attachments
To add attachments to an email, add them to the array returned by the attachments method.
Firstly, add an attachment — provide a path to the fromPath method:
use Illuminate\Mail\Mailables\Attachment;

/**
* Get the attachments for the message.
*
* @return \Illuminate\Mail\Mailables\Attachment
*/

public function attachments()
{
    return [
        Attachment::fromPath('/path/to/file'),
    ];
}
While attaching files, specify the display name or MIME type — use the as and withMime methods:
/**
* Get the attachments for the message.
*
* @return \Illuminate\Mail\Mailables\Attachment
*/

public function attachments()
{
    return [Attachment::fromPath('/path/to/file')->as('name.pdf')->withMime('application/pdf')];

}
Attaching Files From Disk
Attach files from filesystem disks using the fromStorage attachment method:
/**
* Get the attachments for the message.
*
* @return \Illuminate\Mail\Mailables\Attachment\[]
*/

public function attachments()
{
    return [
        Attachment::fromStorage('/path/to/file'),
    ];
}
Additionally, specify the name and MIME type for the attachment:
/**
* Get the attachments for the message.
*
* @return \Illuminate\Mail\Mailables\Attachment\[]
*/

public function attachments()
{
    return [
        Attachment::fromStorage('/path/to/file')
                ->as('name.pdf')
                ->withMime('application/pdf'),
    ];
}
To specify a storage disk use fromStorageDisk method:
/**
* Get the attachments for the message.
*
* @return \Illuminate\Mail\Mailables\Attachment\[]
*/

public function attachments()
{
    return [
        Attachment::fromStorageDisk('s3', '/path/to/file')
                ->as('name.pdf')
                ->withMime('application/pdf'),
    ];
}
Raw Data Attachments
To attach raw data, use fromData method:
/**
* Get the attachments for the message.
*
* @return \Illuminate\Mail\Mailables\Attachment\[]
*/

public function attachments()
{
    return [
        Attachment::fromData(fn () => $this->pdf, 'Report.pdf')
                ->withMime('application/pdf'),
    ];
}
Inline Attachments
To embed an image, use the embed method.
The system automatically makes the $message variable for all templates:
<body>
    Here is an image:
    <img src="{{ $message->embed($pathToImage) }}">
</body>
Headers
To attach additional headlines, define a headers method. It will return Illuminate\Mail\Mailables\Headers instance:
use Illuminate\Mail\Mailables\Headers;

/**
* Get the message headers.
* @return \Illuminate\Mail\Mailables\Headers
*/

public function headers()
{
    return new Headers(
        messageId: '[email protected]',
        references: ['[email protected]'\],
        text: [
            'X-Custom-Header' => 'Custom Value',
        ],
    );
}
Tags & Metadata
Add tags and metadata via Envelope definition:
use Illuminate\Mail\Mailables\Envelope;

/**
* Get the message envelope.
*
* @return \Illuminate\Mail\Mailables\Envelope
*/

public function envelope()
{
    return new Envelope(
        subject: 'Order Shipped',
        tags: ['shipment'],
        metadata: [
            'order_id' => $this->order->id,
        ],
    );
}
Working with Laravel Mail
Creating the Laravel Email Template
With Laravel, you can create templates, including buttons, tables, and panels — a rare feature for other frameworks' markdown support. The template is a fully customizable Blade file.
Template files use the .blade.php extension. They are stored in the resources/views directory.
To return Blade views from routes or controllers, use view helper
Displaying Data
To display data, use the route:
Route::get('/', function () {
    return view('welcome', ['name' => 'Samantha']);
});
Display the contents of the name variable:
Hello, {{ $name }}.HTML Entity Encoding
To disable double encoding, use the Blade::withoutDoubleEncoding method from the boot method of AppServiceProvider:
<?php
namespace App\Providers;
use Illuminate\Support\Facades\Blade;
use Illuminate\Support\ServiceProvider;

class AppServiceProvider extends ServiceProvider
{
    /**
    * Bootstrap any application services.
    *
    * @return void
    */

    public function boot()
    {
        Blade::withoutDoubleEncoding();
    }

}
Sending an email with Laravel
To send an email in Laravel, use one of the API-based drivers: Mailgun, SparkPost, Amazon SES or Mailtrap email API. You may set a default driver in a mail configuration file and manage particular types of messages with SparkPost:
Mail::mailer('sparkpost')
	->to($emailAddress())
    ->send(new NewUserNotification));
Sending Emails Through Laravel using SMTP
You may use any SMTP server, Gmail, for instance. All the configurations are in config/mail.php file.
Laravel recommends using the Mailtrap SMTP server. It ensures that the actual users will never get a test email — to send a message to real users, change the configuration:
MAIL_MAILER=smtp
MAIL_HOST=smtp.googlemail.com
MAIL_PORT=465
[email protected]
MAIL_PASSWORD=your password
MAIL_ENCRYPTION=ssl
Integrate Mailtrap with Laravel
Laravel did work with Mailtrap simple. There is a default Mailtrap server, so you only need to enter credentials. Use Cloudways Managed Hosting Platform to install Laravel and paste the configurations in the .env file.
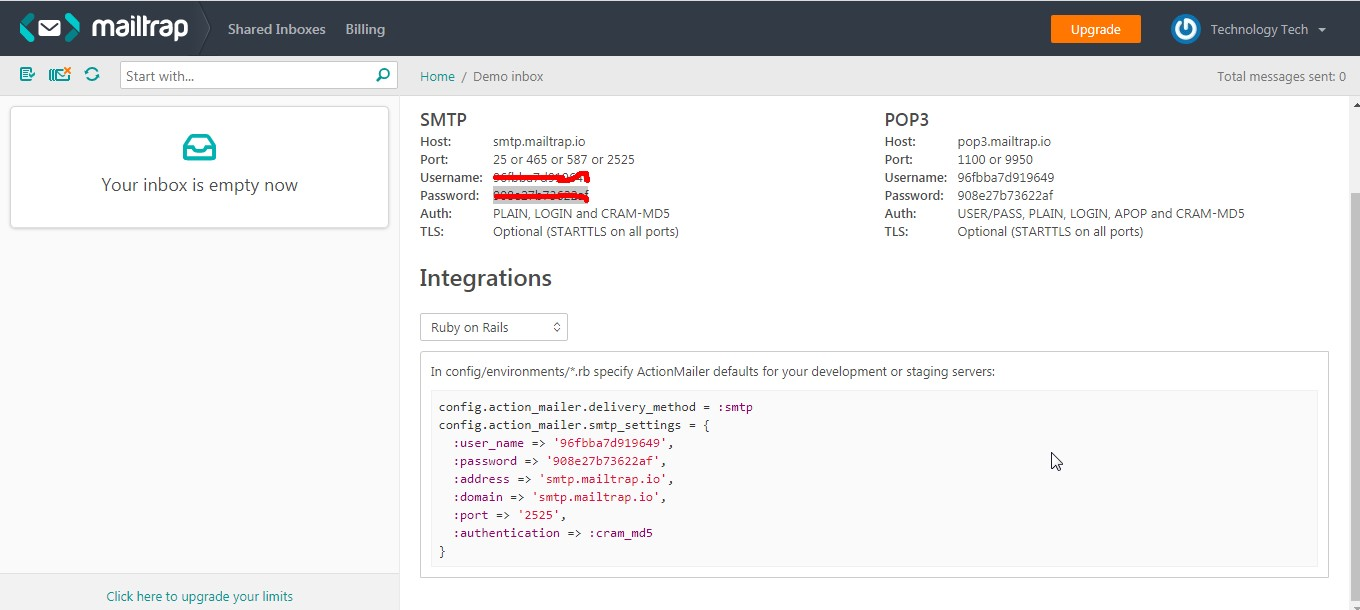
MAIL_DRIVER=smtp
MAIL_HOST=smtp.mailtrap.io
MAIL_PORT=2525
MAIL_USERNAME= //your username generated by Mailtrap
MAIL_PASSWORD= // your password generated by Mailtrap
[email protected]
MAIL_FROM_NAME=ExampleLaravel Versions
Laravel releases a new version every year. All the versions designated LTS are supported with security fixes for three years and bug fixes for two years.
The 9th version of Laravel was released on February 8, 2022. The 8th version is still maintained; older ones are not updated or maintained. The 10th version may be released on February 7, 2023.


